DIY iPhone case
This easy diy iphone case craft will make your iphone unique and stand out.
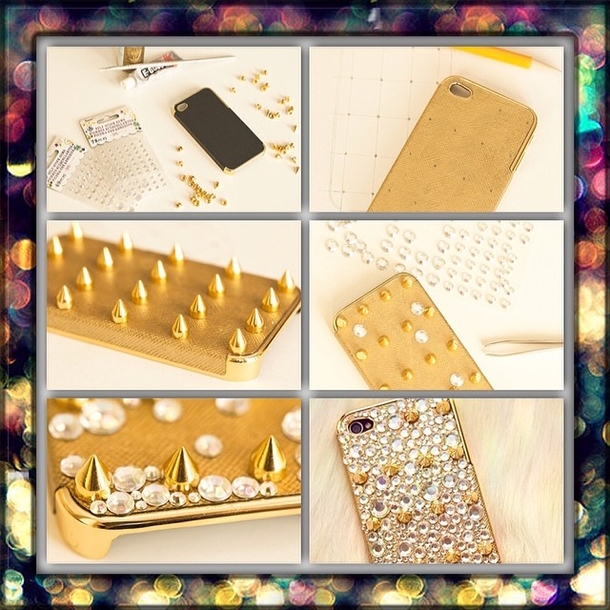
Supplies needed:
A phone case, try this or this (If you’re going for the golden look, it’d be best if you could get a case that’s already entirely gold, as the paint could flake off, taking the embellishments with it.)
Cone studs Rhinestones in a variety of sizes. (You could get the self-stick kind, but I found that gluing them was sturdier.) Superglue. (I ended up using Gorilla Glue superglue as it dried much faster than E6000 and was easier to work with.)
Some sort of tweezers First, I painted the black gold. Again, I don’t particularly recommend having to paint it since I think it contributed to some little stones falling off. Or, it would probably be alright if you sealed it.
Next, I traced around the case on a piece of paper and made a little grid with a ruler. I marked where the studs would go, then flipped the paper over onto the case and marked the dots on the other side of the paper, which transfered the marks onto the case.
The next step was simple; I grabbed the studs and got to gluin’! Then, it got exciting – time for rhinestones. It’s best to start with the largest first and gradually fill in the others, medium to extra definitely-have-to-use-tweezers tiny.
Also, unless you want to glue your fingers together, I would recommend putting a tiny dab of glue where you want to place the rhinestone, instead of on the rhinestone itself.
Now, you might be thinking that’ll take forever, but it really wasn’t all that bad! The whole DIY took exactly the time it took to watch Lord of the Rings 3. Pretty great use of time, if you ask me. I think you could get really creative with this. Use gold and silver for some mixed metal, or they even have some rose gold studs hanging out on Ebay. Use your imagination!


